Monday 28 November 2011

Zelda Hyrule Shield - fibre glassing

My Hyrule shield is nice and fibre glassed. It took some time because I did it in 2 parts. The first was to fibre glass the shield base so that it was nice and stiff. That way, I can put the details on without having to worry about the details bending that base.

Here it is, all nicely fibre glassed. There is something that I kind of regret and I'm wondering how to improve. I applied the fibre glass resin on the underside of the details so that it would hold it's shape better. The problem came about after I applied it, the piece was still bendy and I need it to harden into the right position. I applied some resin to the base and loosely stuck it down. I really needed a way to stick it down much better, maybe with some masking tape, but right now (I don't think you can see in the picture) there are gaps between the detail and the base. I think a few more layers of resin could sort that out, or even when I apply the P38, it'll fill in the gaps automatically.

I modified the centre triforce part slightly. Looking at a number of pictures, the top of that piece should go into the top part of the shield, so I cut a bit off before sticking it down. I also cut a bit more off around the other sides so that more of it will stick closer to the base.

One major thing I have learnt from the Iron Man helmet is that I need to apply the P38 in THIN layers. I still need to be able to see where the edges are and slowly add more to model it. The Iron Man helmet is now in the process of being drawn on, sanded down, and then realising that I misses and having to add more p38 on to create a new detail feature. I'm wondering should I start over and assume the first test piece was a failure...... or work in progress...... forever.

Probably one more layer of resin before I continue onto the P38, however, a question has popped up: why do I need to cover the whole thing in P38? Can I just use it like filler and have the outside mostly resin? The details are all there, it just needs a little touching up and slight altering to make things a little smoother. I only have a few reference sites to look to and it seems like everyone covers their models in bondo. I'd better go and check more out to see if I can take this short cut.

Wednesday 16 November 2011

IM helmet with P38 filler

In the end, I applied about 2-3 layers of fibre glass resin on the outside and only about 1 layer of fibre glass tissue on the inside. The reason being was because the fibre glass tissue was a pain to use. I had already cut the fibre glass tissue into about the size of a 5 pound note but as I was placing them into the inside of the helmet, they started disintegrating when I tried to move them around into the right position. Next time, I'll cut them up smaller. It should also allow me to get into the even smaller areas. Now that I've gained the experience from the IM helmet, I think I'll have an easier time with the shield.

 This is with the filler on the helmet. I've almost used the whole tub for this one helmet. All the details have gone. I'm considering making the same pepakura helmet to get the details but I've also got another helmet already that I can use to get what I need.

Here it is partially sanded down. The Black and Decker mouse sander made very quick work of this. Mostly everything has been sanded down smooth, but there are some holes which I've gone and added more filler, but I'm still waiting for it to dry before I continue sanding.

The sanding from here on is out is down to my skill to see if I can make it look amazing. I'm temped to do it quickly for a quick test piece, but if I'm going to make a silicon mould from this, it's best if I make a decent job of it and make more. I've got a feeling that I can finish off everything in about 2 days..... which then means, I'll need the silicon mould stuff...... I've got to go and find some.

Monday 14 November 2011

Zelda Hyrule Shield - A little break

I'm taking a little break from Iron Man because the fibre glass is drying and also, I'm probably going to do another layer and I'm dreading it. Using fibre glass tissue is a pain. I'm opting for the fibre glass mat next time or I'm going to cut it up smaller then the size of a five pound note because they kind of disintegrated when I tried to smooth it out onto wherever I was trying to put it.

 Hmm, the printer had some new ink cartridges installed and it probably hasn't been calibrated yet. It's meant to be just grey, but then again, next time I go and print any of the pepakura files out, I'm going to get rid of the colour, it's just a waste of ink if I'm going to cover it in stuff.

 It's only took a day, but here is the base of the Hyrule shield. It flexes slightly which I don't like so I've gone and glued some scrap paper to the bigger pieces so it's a little more stable.
 This took a surprisingly longer time then I expected. It took me a whole day. I've got a feeling it was because I kept getting disturbed.

I'm really not happy about the Triforce in the middle. The left triangle seems to be missing an edge, there's no fold to define it and that's not all. The triangle on the right is flat. If I cover it with fibre glass, I'll probably forget there it is. I'll have to do something about this when I'm sanding in the details. I'm thinking 3 embossed triangles.
Here is everything just placed piled on top to see the effect. It doesn't look bad......... but there's something missing in the middle. I've gone and checked out a few pictures and I wish the part in the middle wasn't missing. It means I'll have to draw it in somehow. I'm thinking of making a stencil from a picture.

Another problem has cropped up. If I apply fibre glass to the underside of the shield, the top details would still be flimsy and I wouldn't be able to apply the P38 properly. I wonder if I can put on a number of layers of resin to try and make it harder or should I cover the front with fibre glass.....hmmmm, it might be an idea to try and use up the rest of the fibre glass tissue seeing that it's so thin.

While I'm thinking about how to sort out the fibre glassing problem, I've also got to think about what I'm going to put on the back. Should I go for the wooden back look, or should I just go and add some sort of Velcro strap to be able to hold on to it. Should I also have a method of being able to hold the Master Sword onto it?

Friday 11 November 2011

The beginning of fibre glassing, but compare first

Before I get on to the fibre glassing, I'd just like to compare the helmets that I've made.

 The one on the left is my first one. It's highly detailed and requires a lot of fiddly parts that need to be glued together. I'm using prett stik and it proved quite difficult. The one on the right was much easier and also felt more stable. It didn't have too many small tabs because as you can see from the mask, it was glue strips together which meant full size tabs to stick together.

 Here's the front view. The mask is almost 2 layers of paper thick because of all the tabs and it really helped with the solidity. The one of the right was also a Mk2 design instead of the Mk6 design on the left..... but can anyone else tell the difference? The details can be added in later.

 Front view. I've got a feeling that I want to make this again just to keep on display.

 Side view

 Back view

 Other side view

 There are holes in the eyes and the mouth area. I used some masking tape to seal them up before fibre glassing.

 Today, I've only applied about 1 and a half layers of resin onto the helmet. What you can't see is the underside which doesn't have anything applied yet.

I got the fibre glass resin and hardener from Halfords.
David's Fastglas Resin 500ml - 6.00GBP
David's Fastglas Hardener - 2.49GBP

Tomorrow, I plan to apply fibre glass sheets into the inside to make it more solid so that I can apply the P38.

Here's a closer image of what it looked like. The other 2 pieces are actually the wrist and the forearm.

IM helmet again Mk2

I've gone and made the Iron Man helmet again but from a different papekura file then the last one. I needed a slightly smaller one and to get a tighter fit to my head (not too tight hopefully) and also I didn't need too much of the detail that my current file had.

The file I'm using is called IronmanletterMk2. I've downloaded so many pepakura files that I can't remember where I downloaded it from or even who made the file to begin with. If I'm right it's Dung0Beetle's and I really need to give credit to him. Even if it isn't, he's got so much out there, I'm probably right. It's actually a  Mark 2 helmet but all of them are very similar and I only need it for the frame. The details can be put in later after I've put the P38 all over it and smooth it down.


 The mask came out really well. It kind of reminds me of Frankenstein from Death Race. There's a helpful bar at the bottom which allows the mask to widen itself instead of curl up like it wants to.

 This is the lower back of the helmet. It's actually 2 parts. They don't fit together perfectly, but everything's going to merge together anyway.

 This is the "frame" of the whole helmet. There's also another piece in the middle there which sets the width of the jaw. This was probably the part which caused the most problem because it was waving about the place but even then it was okay to handle.

 This is just everything piled on together to see if everything would fit ok if I stuck everything together with masking tape.

 There are actually small tabs that allowed me to connect the top of the mask to the frame. The rest was pretty much masking tape on the inside holding everything together. It looks really cool and fits together pretty well. The only thing was that once everything was held together, there's a gap between the lower part of the mask and the frame. I'm not quite sure what to make of it. It shouldn't affect me much I don't think. The fibre glassing and the P38 filler should iron things out.

I was actually left with these 2 parts. I've finally found out that they're meant to be the joining parts to connect the frame to the back of the head. I'll glue these on after I've finished with the blog.

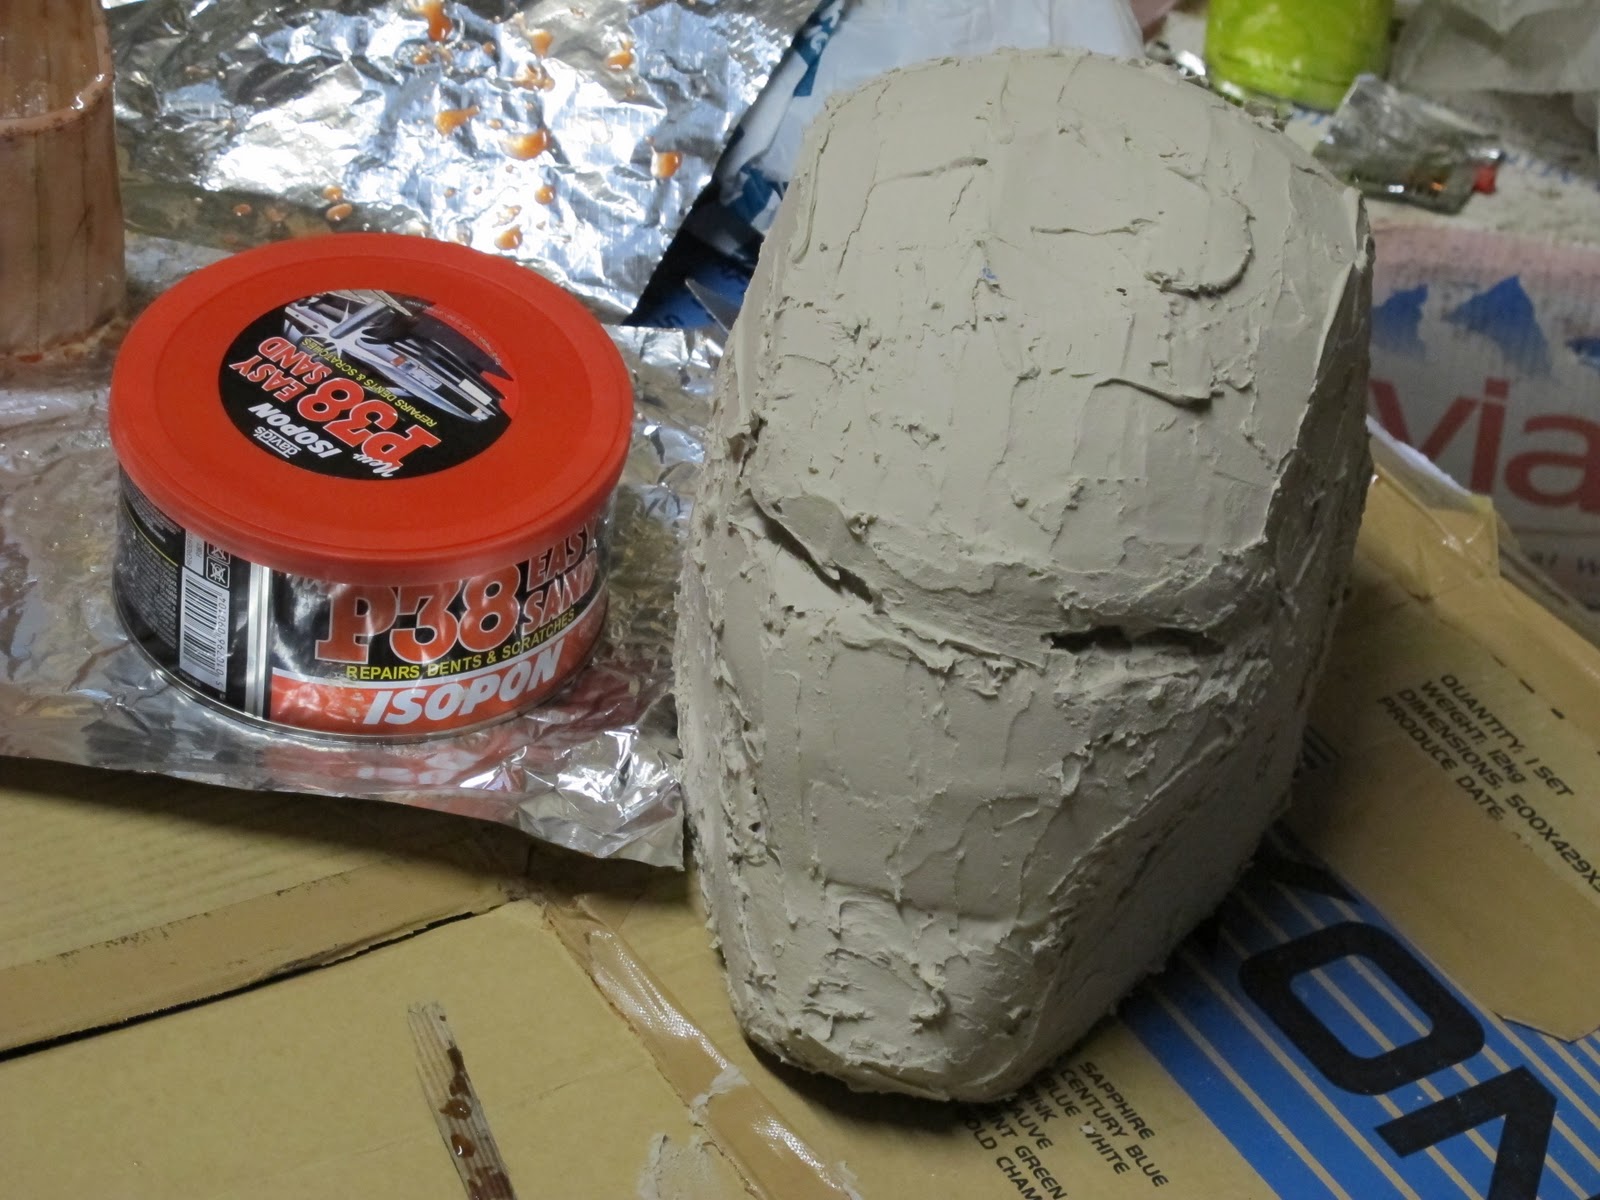
Next up is to fibre glass this and then put filler all over it and sand it down. I've still got to go and look for a silicon moulding kit.

The actual file I used to make this worked really well, and the only change that I made was to allow it to print onto A4. There were a few things wrong, but then again, it's much clearer then the highly detailed one and it was much easier to just think a way around it.

What's on my mind now is that this paper helmet had some ideas of how the back part could move up into the top to allow it to be worn...... but I'm going to be covering the whole thing in fibre glass. Should I split it up and put the parts together later, or just do the whole thing at once. I think I'll do the whole thing at once and work something else out later. This helmet wasn't hard to make, it only took me 2 days and came out really well.

It does feel a little small, but hopefully, everything will bulk up with the fibre glass and P38 are applied.

Tomorrow, the start of the fibre glassing.

Sunday 6 November 2011

Iron Man helmet finished glueing......

Okay, I've got the Iron Man helmet made of paper designed from the pepakura and I've finished glueing it all together..... well almost.

Here is my Iron Man Helmet. With a load of masking tape to bind it together. I didn't realise that the chin, the face plate and the back of the head were in 3 separate parts and this was the only way to get them together. It's a good idea and it shows where the different pieces are meant to be.

Before I finished the helmet off like this, it was still in pieces and I was sitting back checking out this new Stark Industries website forum. It's got a lot of useful tips and you get to see some other people also building their own armour. I'll probably join once I get a few more parts. The most interesting part I saw was someone else also making the helmet. They'd also made it out of pepakura and fibre glassed it (now here's the clincher) and they've used filler all around it and smoothed it out completely so it looks really good. I'm guessing the next part was to make a silicon mould and make plastic copies, but my biggest problem was the filler part. Even if I can try to keep most of the detail after putting 3-4 thin layers of fibre glass on the model, I'm probably going to loose mostly everything when I have to put the filler on top to start smoothing things down. I can probably try to get the details back afterwards but right here and now, the details are irrelevant in the paper model. I could probably just get the details from pictures and carve them into the master model.

Anyway, I taped everything up and that's what you see from the model above. It looks okay and I really wasn't going to continue with the eyes and the cheek part with all the fiddly parts if I'm going to lose all the details. There is another problem that's cropped up. You might not be able to see from the photo, but it feels a little too big. I think I finally understand why there are sections on scaling and there was a tester helmet. The only problem is I don't know what the actual measurements in the pepakura means. The height, width and depth don't seem to correspond to the actual model, or do they and I've got it wrong.

The model is ready to be fibre glassed but I'm not sure if I should continue with this model. Even if I finish this, I wouldn't be wearing it because it does feel a little too big.

I've found 3 other pepakura files for the helmet and they seem to be much less detailed then the one I've worked with. It should be a very good idea, but I might need to go through the whole process of making it without changing the scale unless I figure out the scaling issue.

On another side note, my printer has run out of ink so I can't continue printing different parts out to continue. I can't even start on a new head yet.